Use PTB on raspberry Pi
Raspberry Pi 4 setup
Compute Module 4
We’ve found these industrial modules https://docs.edatec.cn/cm4-nano that use eMMC and the compute module 4 (CM4), currently cheaper, with a nice case and more features than RPi4. To burn the OS, you can use rpiboot (github) or sudo apt install rpiboot and then run rpiboot to mount the eMMC as a disk via a USB cable (you must join the J55 jumper pins). Then use RPi Imager (snap install rpi-imager) to burn the OS (it can set up password / WiFi etc. very cool). Note for an 8GB EMMC we need to be careful with what we install on the system, and an external SSD is highly recommended.
OS Options
The standard OS is 32bit (armhf) based off of Debian Bullseye 11. It is tiny and light, with Octave at V6.2. There is also a 64bit (aarch64) OS, which works well (and should be faster, utilise RAM better etc.). Ubuntu 22.04 64bit (aarch64) is also available. Both support Neurodebian, but a standard PTB install require a 32bit OS (Mario only builds 32bit mex files), so Raspian 32bit is preferred for this.
At the moment there are no 64bit builds of PTB for RPi, BUT we have a fork where we have the 64bit ARM mex files (see below). So the current setup:
- Latest Raspberry Pi OS 64bit
- Octave from Debian (V6.4) and can also install OCtave V8.2 via
micromamba - Install PTB via github 64bit ARM fork.
Installing PTB
Use sudo apt install octave
Clone https://github.com/iandol/Psychtoolbox-3/tree/arm64 for built mex files you can use and the changes needed to build them.
In a terminal type: sudo raspi-config; Navigate to Advanced Options > Compositor > xcompmgr composition manager; Choose No; Reboot the Raspberry Pi.
Next:
sudo apt install -y liboctave-dev gamemode freeglut3Create an ~/.octaverc file with the following:
warning('off', 'Octave:shadowed-function');
graphics_toolkit('gnuplot');
more off;
setenv('LC_CTYPE','en_US.UTF-8');setenv('LC_ALL','en_US.UTF-8')
Screen('Preference','VisualDebugLevel',3);
First, it is important to run Octave from command-line via octave --no-gui then cd ~/Code/Psychtoolbox and run SetupPsychToolbox. Then you can use the GUI as normal…
See https://github.com/kleinerm/Psychtoolbox-3/blob/master/Psychtoolbox/PsychDocumentation/RaspberryPiSetup.m for the official details. As we are using our own 64bit fork, use the github repo and branch mentioned above to install the custom 64bit build.
libdc1394
Need a .22 linked to the current .25:
sudo ln -s /usr/lib/arm-linux-gnueabihf/libdc1394.so.25 /usr/lib/arm-linux-gnueabihf/libdc1394.so.22Up-to-date Octave (currently 8.2) [optional]
Older Octave V6.2 can run PTB as well, so this step is optional!
Octave is really old in Debian, and it is not so easy to build. Using flatpak cannot work with PTB due to the sandbox. However conda, or more specifically microconda can be used to build a custom environment will the latest octave and all dependencies easily. Conda used to be for Python but now is a general and flexible package manager for just about anything! See https://mamba.readthedocs.io/en/latest/installation.html for details, but quickly you can do this:
curl micro.mamba.pm/install.sh | zsh
export MAMBA_ROOT_PREFIX=/some/prefix  # optional, defaults to ~/micromamba
eval "$(~/.local/bin/micromamba shell hook -s posix)"
micromamba create -n octave
micromamba activate octave
micromamba install -c conda-forge octave gstreamer gst-plugins-bad compilers c-compiler cxx-compiler
octave --gui
The compilers are needed for installing octave packages like instrument-control…
Latest MESA [optional]
You can update the GPU drivers. The easiest way is to use precompiled ones, see https://www.raspberrypi.org/forums/viewtopic.php?f=67&t=293361 and https://github.com/smartavionics/Cura/releases in particular.
LD_LIBRARY_PATH=/opt/mesa/lib/aarch64-linux-gnu octave --guiOr set LD_LIBRARY_PATH in your .zshrc to use as the default…
You can build Mesa yourself from source: https://qengineering.eu/install-vulkan-on-raspberry-pi.html
Building PTB on 64bit (work-in-progress)
Dependencies:
sudo apt install -y freeglut3-dev libglfw3-dev libglu1-mesa-dev libxi-dev freenect \
  libpciaccess-dev libxxf86vm-dev libxcb-dri3-dev libxcb-present-dev \
  libxcomposite-dev libxml2-dev libasound2-dev liboctave-dev \
  libgstreamer1.0-dev libx11-xcb-dev libgstreamer-plugins-base1.0-dev \
  libraw1394-dev libdc1394-dev portaudio19-dev libopenal-dev libopenxr-dev \
  libfreenect-dev libopenhmd-dev
To build Screen, you need to add -I/usr/lib/aarch64-linux-gnu/glib-2.0/include/ on RPi to mex or:
sudo ln -s /usr/lib/aarch64-linux-gnu/glib-2.0/include/glibconfig.h /usr/include/glib-2.0/To build/use GPIO, you need this package that is not available anymore in apt: https://github.com/WiringPi/WiringPi/releases
Command is linuxmakeitoctave3(-1); with most mex files rebuilt, performance is at least equivalent (and theoretically better) to 32bit builds!
OLD Option: Neurodebian
You could install PTB via Neurodebian (supports Raspian and Ubuntu) which solves dependencies easily.
Raspian:
wget -O- http://neuro.debian.net/lists/bullseye.cn-bj1.full | sudo tee /etc/apt/sources.list.d/neurodebian.sources.list
sudo apt-key adv --recv-keys --keyserver hkps://keyserver.ubuntu.com 0xA5D32F012649A5A9
sudo apt-get update
Tsinghua Ubuntu 22.04:
wget -O- http://neuro.debian.net/lists/jammy.cn-bj1.full | sudo tee /etc/apt/sources.list.d/neurodebian.sources.list
sudo apt-key adv --recv-keys --keyserver hkps://keyserver.ubuntu.com 0xA5D32F012649A5A9
sudo apt-get update
Then sudo apt install octave-psychtoolbox-3 which will resolve all dependencies for you. However, this installs an ancient version of PTB.
Gamemode [legacy OS only]
This allows PTB’s Priority command to work better on Linux. Install directly from APT (from Bullseye at least). But for older systems you can build from https://github.com/FeralInteractive/gamemode like so:
sudo apt install meson libsystemd-dev pkg-config ninja-build git libdbus-1-dev libinih-dev
cd ~/Code
git clone https://github.com/FeralInteractive/gamemode.git
cd gamemode
git checkout 1.6.1 # omit to build the master branch
./bootstrap.sh
Problems
32-bit rendering was fixed in a recent PTB update, Mario says fonts work, the only thing broken ATM is HDMI audio.
Low disk space on 8GB EMMC?
You can use the built-in ncdu command (cd /; sudo ncdu), or install QDirStat as a GUI. Snap cache can be cleared with sudo ~/bin/snapcache.sh and you can use sudo apt install bleachbit to clear logs and remove locale files to save ~400MB. You can also use synaptic to sort installed packages by size then try to find ones that seem not essential (pypy, geany and some others).
Interface to GPIO?
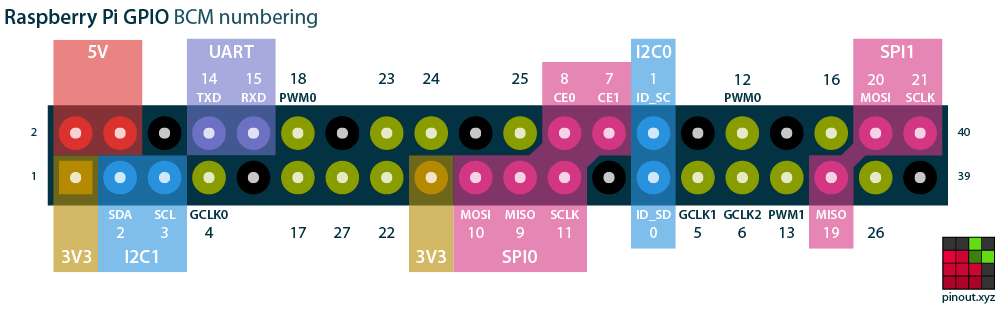 https://pinout.xyz/
PTB has a demo: RaspberryPiGPIODemo.m – this uses the WirinngPi library that uses a different pin number scheme, and I can’t get the gpio command to work.
https://github.com/gnu-octave/octave-rpi-gpio
https://www.raspberrypi.org/documentation/usage/gpio/
http://abyz.me.uk/rpi/pigpio/
Octave has a pythonic python bridge and there are several libraries to call GPIO from Python. Or use pigpio and sockets. Octave has several packages that will be useful:
https://octave.sourceforge.io/instrument-control/index.html
Older Config and Workarounds
There is currently a MESA bug, and a current workaround is to make an /etc/X11/xorg.conf file to overrride the bug: https://gitlab.freedesktop.org/mesa/mesa/-/issues/3601
Section "ServerFlags"
  Option "Debug" "None"
EndSection
You should edit \boot\config.txt to make sure it uses the real open-source drivers, and not fake kms one dtoverlay=vc4-fkms-v3d:
[pi4]
# Enable DRM VC4 V3D driver on top of the dispmanx display stack
dtoverlay=vc4-kms-v3d-pi4
max_framebuffers=2
gpu_mem=256

[all]
gpu_mem=256
Backing up the SD/eMMC system
Backing up can be dome simply using dd. You can do it live, but better is on a different machine. For live, first insert a USB backup disk, then check the disk names lsblk -p:
cogpi@cogpi-desktop:~$ lsblk -p
NAME             MAJ:MIN RM   SIZE RO TYPE MOUNTPOINT
/dev/loop0         7:0    0  48.8M  1 loop /snap/core18/1949
/dev/loop1         7:1    0  57.2M  1 loop /snap/core20/907
/dev/loop2         7:2    0  48.8M  1 loop /snap/core18/1888
/dev/loop3         7:3    0 214.1M  1 loop /snap/gnome-3-34-1804/61
/dev/loop4         7:4    0 197.7M  1 loop /snap/gnome-3-34-1804/68
/dev/loop5         7:5    0  64.8M  1 loop /snap/gtk-common-themes/1514
/dev/loop6         7:6    0  62.1M  1 loop /snap/gtk-common-themes/1506
/dev/loop7         7:7    0  48.3M  1 loop /snap/snap-store/499
/dev/loop8         7:8    0    27M  1 loop /snap/snapd/10709
/dev/loop9         7:9    0 108.5M  1 loop /snap/qv2ray/3910
/dev/loop10        7:10   0  26.9M  1 loop /snap/snapd/9730
/dev/loop11        7:11   0  47.3M  1 loop /snap/snap-store/476
/dev/sda           8:0    1 119.3G  0 disk
├─/dev/sda1        8:1    1   256M  0 part /media/cogpi/boot
└─/dev/sda2        8:2    1   119G  0 part /media/cogpi/rootfs
/dev/sdb           8:16   0 931.5G  0 disk
├─/dev/sdb1        8:17   0   489M  0 part /media/cogpi/CLONEZILLA
└─/dev/sdb2        8:18   0   931G  0 part /media/cogpi/Clones
/dev/mmcblk0     179:0    0  14.8G  0 disk
├─/dev/mmcblk0p1 179:1    0   256M  0 part /boot/firmware
└─/dev/mmcblk0p2 179:2    0  14.6G  0 part /
/dev/mmcblk0 is the booted SD card, /dev/sdb2 mounted as /media/cogpi/Clones is our backup destination.
sudo dd if=/dev/mmcblk0 of=/media/cogpi/Clones/MyImage.img bs=10M conv=fsync status=progressOnce completed, shrink the image using PiShrink. This can be compressed:
sudo pishrink.sh -v -z -a MyImage.imgTo restore it read https://www.pragmaticlinux.com/2020/12/how-to-clone-your-raspberry-pi-sd-card-in-linux/
But basically, reverse the command:
sudo dd if=/media/cogpi/Clones/CM4-2023-05-22.img of=/dev/mmcblk0 bs=10M status=progress